Why Selecting Multiple Images Is So Useful
Firstly, we need to understand why being able to select multiple images is useful. Adobe Lightroom lets you add metadata to each one of your photos. If you don’t know what metadata is, just think of it as attributes that you can associate to individual images. For example, you can give your images a rating, you can flag and image, add keywords or even a coloured label. By having this attributes associated to each one of your photographs, it makes it simpler to be able to filter your images for a specific purpose. For example, if you read your very best photographs as five stars, you can then ask Adobe Lightroom to only display the photographs, they have a rating of five stars. This is a simple example, but, you start to get the idea of how useful this would be. One of the ways that I use meta data on my images is bye, inserting my client’s name as a keyword onto their images. This means that I can easily find any images related to a specific client very quickly and accurately. It is also a great way to only export photos from Lightroom that you want.
MAC or PAC?
Before we start, let’s acknowledge that there are some differences in the way you do this depending on the type of computer you are using. That is, if you are using a MAC or PC. Don’t worry about it, I will point out those differences once we come across them. So let’s have a look at the process to select multiple images in Adobe Lightroom!
How To Select Multiple Images In Lightroom
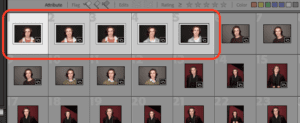
The process for selecting multiple items, is similar across all applications. The first place we are going to have a look at is the library module. This is where are you going to be doing all your metadata work. In this example, we are going to be select multiple images and assigning star rating of three. Let’s click on the first image we want to select. You will notice that the shade around the image changes color. Now while holding the [SHIFT] key, select on the fifth image we want to select. You will now notice that all the images between the first and the fifth have changed also.

We will not right-mouse click on any of the selected images. We will then navigate to Rating and give it a rating of 3 stars.

Once you’ve done this, you will notice that all the selected images will show three stars will open the photo.
How To Select Multiple Random Images In Lightroom
The above method is the great way to select a range of photographs where they are all sequential to each other. But what if you want to select only the first third and the fifth photo?
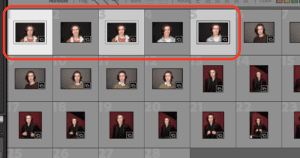
In order to do this, we are going to have to use a different keyboard combination. First, let’s just click on the first image to reset the previously made selection. Now, after you have selected the first photograph, you will need to select the third photograph whilst holding the [COMMAND] key if you using a Mac or the [CTRL] if you are using a PC. you will notice that only the first and third photograph have now been selected. Now click on the fifth image. The result should be that the first, third and fifth image are now selected.

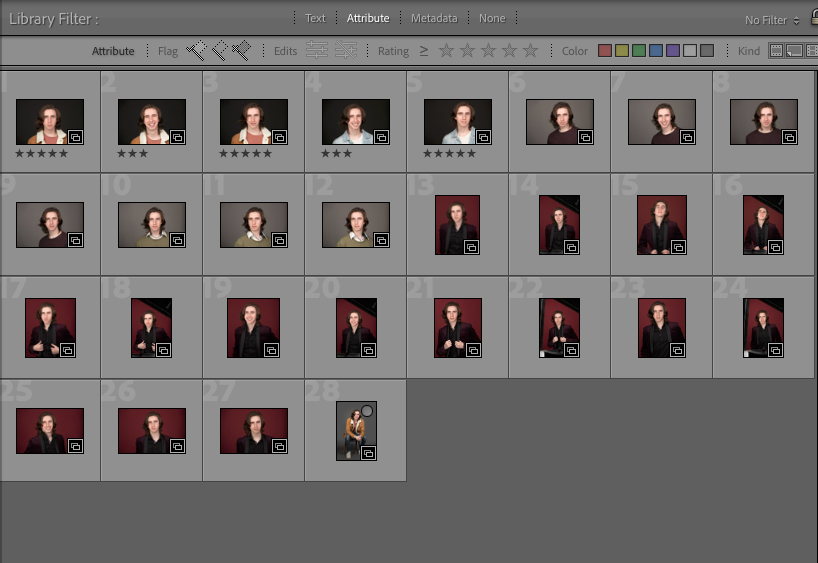
You can now write mouse click on those photographs and give them a separate rating, such as five stars. Once you’ve done this, you will see that the first third, and fifth image have a rating of five stars, while the second, and fourth image have a rating of three stars.

You are now probably beginning to understand how this can speed up your work by being able to change the properties of your photographs in a much faster way.
I’ve shown you had to do the inside of the library module, you can also apply the same process inside of the develop module. Let’s have a look at how that works. First go into the develop module. You will see your selected photograph displayed in full screen. Below the image, you’ll see the small previews, just as you did in the library module. This time, select the first and the fourth image, whilst holding down the command key on your Mac all the control key on your PC. Now right-mouse click on either of those two photographs navigate to set color label, and select red. You will notice the both the first and fourth image have a red border around them.
Being able to select multiple images inside of an Adobe Lightroom is a fantastic way to work in the most efficient manner possible. It will also allow you to find images much quicker by using the filters available inside of Lightroom. Let’s have a quick look at how this works. In the filter, drop-down box, select rated. You will see the star rating system appear to the left of the drop-down.

Now select all 5 stars. Light room will automatically filter out any photograph that does not have a rating of five stars. Now select three stars. Lightroom will now display all photographs that have a rating of, three or more stars.
How To Select All Images
Finally, I’m going to show you how to select all your images at the same time, so that you can apply attributes to all of them in one go. This one is super easy! Firstly click on one of the images that you want to select. Now all you have to do is hold down the [COMMAND] key and the letter [A] on a Mac or [CTRL] key and [A] on a PC. this is going to select all of the images. Any attributes that you apply now, will be forced to all the images at the same time.
Deselecting Multiple Images
If you make I mistake was you are selecting multiple images you can also use the same method to remove the selection. If, for example, you have selected the first five images, but you only meant to select the first three images, you can click on the individual images while holding down the command, key on a Mac or the control key on a PC. this is going to reverse your selection. If you like to remove the whole selection and start again, simply click on any individual photograph, or hold down the [COMMAND] and the letter D on an Mac or [CTRL] and the letter D key on a PC. This will remove any selection that you have made.
Keyboard Command Summary:
Select multiple random images
– Mac: Command plus click for individual random images one at a time to select.
– PC: Control plus click for individual random images one at a time to select.
Select multiple sequential images
– Mac: Shift plus click on first image, then, Shift plus click on last image
– PC: Shift plus click on first image, then, Shift plus click on last image
De-select multiple random images
– Mac: Command plus click for individual random images one at a time to de-select previously select images.
– PC: Control plus click for individual random images one at a time to de-select previously select images.
Select all images
– Mac: Command plus letter A
– PC: Ctrl plus letter A
Summary
Hopefully, you will understand the power of being able to select multiple images and applying attributes to them. It is a fantastic way for you to organise your images to that you can quickly find them according to their attributes. This example barely scratches the surface of what is possible. And just to make it easier I’ve included a table below with a summary of how old the keys work so that you can reference them quickly. Ideally, you can bookmark this page for future reference in case you need a reminder.
I hope you found this blog post useful and that it has helped you understand how to select multiple images in Adobe Lightroom. Being able to quickly select multiple images is an important skill and can greatly speed up your work. If you have any questions or feedback for us, please feel free to leave a comment below. Thanks for reading!

